|
|
| |
Activity 6 – Planet Hit List
 Context Context
- There are five planets that are bright enough to be
seen without telescope or binoculars. They are Mercury,
Venus, Mars, Jupiter and Saturn. Unfortunately planets
cannot be printed on a Star Wheel because their positions
on the wheel change from day to day. In this activity you
will learn how to locate these planets on your Star
Wheel.
Specific Learning Outcomes
- You will use your Star Wheel to locate and identify all
five planets: Mercury, Venus, Mars, Jupiter and
Saturn.
Teacher Planning and Preparation
- Seeing all five planets is only rarely possible in one
night. It might take up to six months before you can get a
sighting of all five of these planets. Seeing all five
planets is obviously not a classroom activity, although it
makes an excellent long-term homework project. Give your
students the Planet Hit List record sheet so that they can
keep a record of their sightings.
- Although you cannot see the planets in the classroom,
you can teach
how to find
the location of a
planet and
how to find
out when a planet will
be visible using the instructions below. Get students
to pencil in today’s locations of all five planets on
their Star Wheels, and to work out which planets are
visible tonight. Then get them to work out when each planet
will next be visible in the night sky and to make a plan
for seeing all five planets.
What You Need
Science Background Knowledge
Why don’t planets have fixed locations on the star
wheel?
- Earth is constantly on the move as it races around the
sun once every year. (To clarify Earth’s movement see
“Rotate
or Orbit?” in Activity 2.) The
other planets also orbit the sun, but at different speeds.
As a result the planets appear in different directions at
different times when viewed from Earth. Because both Earth
and the other planets are moving, the result is quite a
complex pattern of movement that is not the same from one
year to the next.
- The stars are also constantly on the move as they race
around the centre of the galaxy. However, they are so far
away from us (the closest star is about 5,000 times further
away than the furthest planet) and the journey around the
centre of the galaxy takes so long that it takes hundreds
or even thousands of years before we can see significant
changes in the locations of the stars. Yes, you will need
to get a new Star Wheel every thousand years or so, but for
the present time we can treat the stars as fixed.
- A simulation of the planets orbiting the sun is called
an Orrery. It enables you to see the planets’ orbits.
An excellent online Orrery is the Schools’
Observatory Orrery. Another is Karen
Strom’s Orrery.
- Visit one of these online Orrerys. Imagine that there
are stars all around the edge of your computer screen. The
stars are not moving. As the planets move you will notice
that they can be seen in different directions at different
times. Each star stays in the same direction, so the
planets appear to wander among the stars. (The word
planet comes from a Greek word meaning
wanderer.)
Why are planets always found close to the
ecliptic?
- When the Solar System formed it evolved from an almost
flat spinning disc. As a result, the planets all go round
the same way, more-or-less in the same plane. This plane is
called the plane of the ecliptic. When we look out from
planet Earth, we see this plane as a line across the sky
called the ecliptic. The planets always appear somewhere
along this line.
- The planets are all more-or-less in the same plane. They vary
from that plane
by only a few degrees (with the exception of Pluto which has an orbit
17° from the ecliptic). You will always find the five planets
Mercury, Venus, Mars, Jupiter and Saturn within a few degrees of the
ecliptic.
These planets are all so bright that even on the occasions when
they are up to 5°
off the ecliptic you will have no trouble identifying them.
- See
a picture of some planets lined up on the ecliptic here.
How bright are the planets?
- To give you an idea of how bright the planets are, here
is a list showing the 20 brightest celestial objects,
arranged from brightest to dimmest.
- Sun
- Moon
- Venus
-
Jupiter
- Mars
- Mercury
- Sirius (brightest star in the night sky)
- Canopus
- alpha Centauri (the pointer furthest from the Southern
Cross)
- Arcturus
- Vega
- Capella
- Rigel
- Procyon
- Achernar
- Betelgeuse
- beta Centauri (the pointer nearest to the Southern
Cross)
-
Saturn
- Altair
- Aldebaran
- Planets vary in brightness over time according to how
far they are away from the sun, and according to how much
of the bright side of the planet is facing towards Earth.
This list has been made using typical values for
brightness. Jupiter is usually brighter than Mars, but at
times Mars outshines Jupiter.
- Mercury and Venus both orbit the sun closer than Earth.
This means that both of them are never seen far from the
sun – they appear only in the evening after sunset, or
in the morning before sunrise.
- Betelgeuse varies in brightness over a period of
several years. At its brightest it is brighter than
Procyon, at its dimmest it is dimmer than Aldebaran. It is
placed here according to its average brightness.
- Sirius is the brightest star in the night sky. If you
see something that looks like a star that is brighter than
Sirius, then it must be a planet.
Do planets twinkle?
- Stars twinkle because their light is bent as it comes
through the air. Turbulence causes them to dance about a
little and to get brighter and fainter. This is called
twinkling.
- Planets do not twinkle as much as stars because, being
closer to Earth, they appear as very small disks instead of
points. The effect of turbulence is not as noticeable for a
disk as it is for a point light source.
- Planets do twinkle, but they twinkle much less than
stars do.
- By the way: Close to the horizon, especially in winter,
you will see bright stars flash vivid red and green. This
beautiful effect is an extreme form of twinkling, but it is
something that planets do not normally do.
Classroom Lead-In
- You can prepare students for planet hunting in two
ways.
Research
- One way is to research what the planets are like, and
what they look like in the night sky. Some useful
Internet references.
Role play
- The other way is to explore how the planets move, and
why they appear in different places on the Star Wheel at
different times. An excellent way to do this is as a role
play.
- Make sure you have a clear space in which students can
move. Have one student in the centre of the space to be the
sun. Have a further nine students to be each of the nine
planets. Place a large circle of students surrounding the
sun and the planets to represent the constellations. It
works best when you can get as much space between the
planets and the stars as possible so the outer circle needs
to be as big as possible. If space is limited you might
want to reduce the number of planets that you
represent.
- Get each of the students in the outer circle to choose
a constellation. For example one student might choose to be
Orion, another might choose to be Scorpio. It is not
necessary to arrange them correctly because this simulation
demonstrates the principles of planetary motion, not the
specifics. However, it is best to restrict their choices to
constellations that are actually close to the ecliptic (
for example, the Zodiac constellations) because planets can
never be found in constellations that are away from the
ecliptic. The students in the outer circle do not
move.
- Instruct the ‘planets’ to orbit by walking
around the sun. So long as you have arranged the planets in
the right order: Mercury, Venus, Earth, Mars, Jupiter,
Saturn, etc, and so long as each ‘planet’ walks
at about the same speed and keeps the same distance from
the sun, they will end up orbiting in roughly the right
way. Now get ‘Earth’ to call out where each
planet can be seen. For example: “I can see Mercury in
Orion and Mars in Scorpio. Now Mercury has moved to
Taurus…”
Instructions
How to find the location of a planet
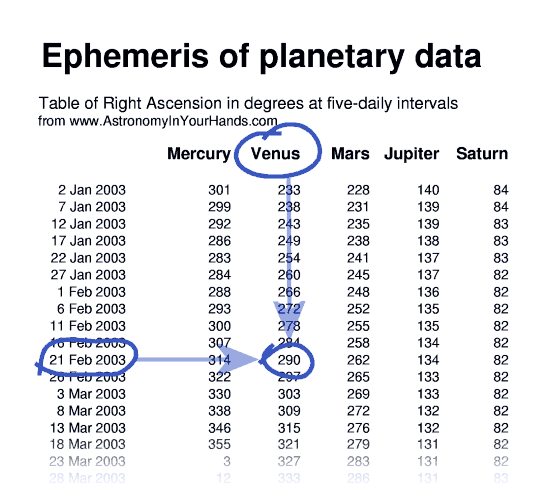
1. Look down the column of dates in the
ephemeris
until you find the closest date to today’s. Look
across to the column for the planet you are interested in.
The number that you find tells you how far around the
ecliptic the planet is today. (The number is called the
Right Ascension of the planet in degrees, but you do not
need to know that to find the planet.) As an example, we
show Venus on the 21st February 2003. The number
is 290.
|
|
| |
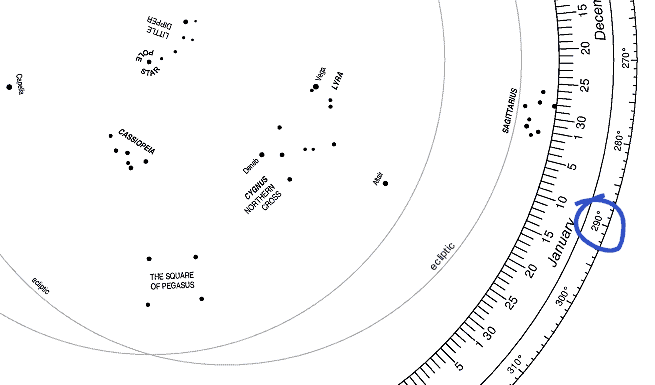
2. Take the wheel out of the pocket of your Star Wheel and
find the same number on the outermost ring of the
wheel.
|
|
| |
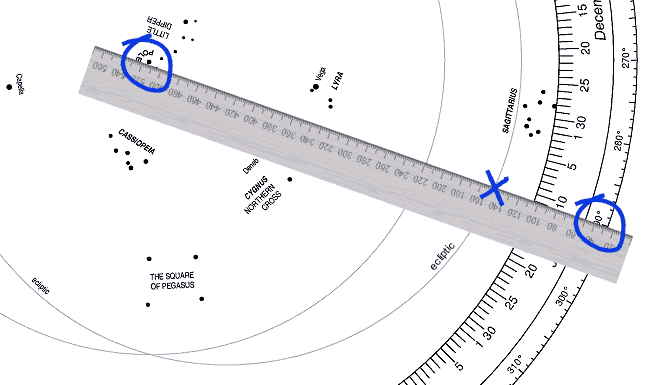
3. Using a ruler or any other straight edge connect that
number with the celestial pole (either the Pole Star or the
South Celestial Pole) at the centre of the wheel.
|
|
| |
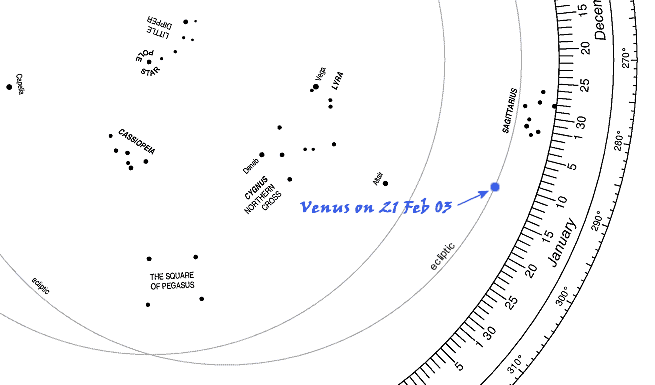
4. The planet will be where the straight line crosses the
ecliptic. You can mark it in with a pencil if you
like.
|
|
| |
5. Now that you know the planet’s location on the
wheel, put the wheel in the pocket and set the Star Wheel
to see if the planet is in the night sky and where to find
it. (Instructions
on setting a Star Wheel)
How to find out when a planet will be visible
- To find out when a planet will be visible you need to
look ahead in the ephemeris and plot the planet’s
location on your wheel for different dates. Keep going into
the future, setting your Star Wheel for each future date,
until the planet appears in the night sky.
Follow Up and Extension
- When students complete the Planet Hit List record
sheet, this achievement can be acknowledged with a
certificate.
Downloadable Resources
|
-
-
URL http://www.AstronomyInYourHands.com/activities/planethitlist.html
Publication date 20 Dec 2002
Copyright © C J Hilder, 2002. All rights reserved.
|
|


